【架構篇】
- 解釋MVC、MVVM
【Git】
- Git跟SVN的差別
【DB】
- 如果遇到效能瓶頸在DB會怎麼做
【不會分類篇】
- message queue怎麼實作
- 非同步/ multi thread 會應用在哪些場景
【其它】
- 過河相關邏輯測驗 River Crossing
【進修方向】
- SQL一定要熟
- Java
- Spring
- CICD經驗
- DB要有基本以上的理解
看到tutorABC
【架構篇】
【Git】
【DB】
【不會分類篇】
【其它】
【進修方向】
看到tutorABC
改svg大小或顏色
    svg {
          width: 16px;
          color: #fff;

          // 有時候要這樣
          path { fill: #fff; }
        }
ant design的form有設定flex: 1 1 auto,所以把它蓋掉
      .ant-form-item-control {
        flex: none;
      }
安裝套件時要先切換nvm版本
Antd的Select的value,是選了option才會有,不是在搜尋的時候的input
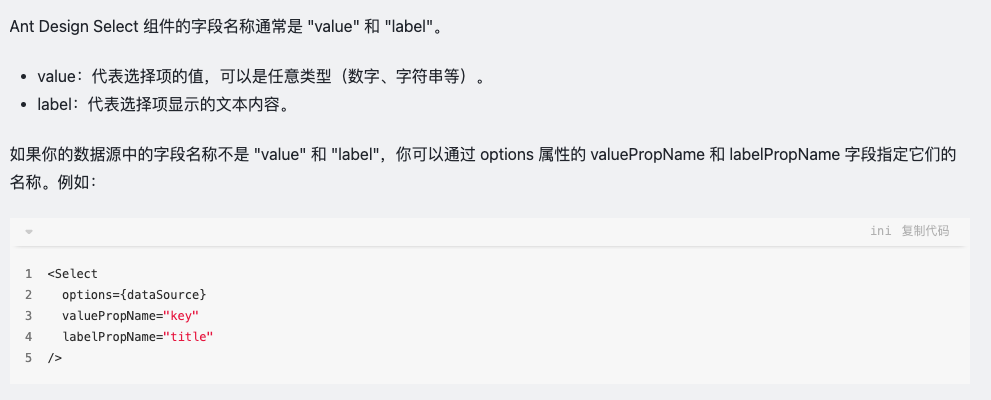


記得要抽component的時候加 …props 跟 {…props}

How to Set Up ESLint Autofix and Prettier on Save in WebStorm
這篇有提出一個workaround,就先暫且用用
Form有使用到useWatch的地方,Input就會變慢…


送出表單後,要確認default value有沒有改成編輯過後的。
我在想要怎麼讓速度變快。
使用套件
【閱讀→理解→實際應用】
這一段要快的話,就是多讀(觸類旁通)例如懂node.js和TypeScript看文件更快。文件有時間的話也要仔細看完,因為可能自己刻了一個方法,結果發現套件有提供,那就白作工了。
【看懂別人的程式】
有時間的話整體看,沒時間就先看要做的功能。
多練多熟悉,以前都自己寫自己的,所以快,如果要依照別人定好的規範的話就要先記熟規範。
這是ChatGPT教的
Alright, imagine you have a big clock that shows the time, just like the one you might have in your room. But there are many clocks all around the world, and they all show slightly different times because some places are ahead of others and some are behind.
Continue reading UTC GMT收集一些面試經典題,有些是面試趣看到的,有些是自己遇到的
Continue reading 面試題目收集:前端篇
【中山區接案,有做小遊戲】
一開始有筆試,考了一些東西,之後是跟前端主管聊天。
因為有各種專案,都是從無到有開始做,做好再交接給其它地方維護,所以用的技術都還蠻新的。用的前端框架有React 18、Next 13、Vue 3 ,做蠻多手機版的。
前端主管說他們蠻重視學習的動力,有的工程師年資到了之後就想放著了,他說雖然前端技術日新月異,不過對資深的前端來說都還是那些東西,比較不會有太難的需求。另外他說覺得演算法會easy的就好了,再進階的會找演算法師。
有在做小遊戲,用pixijs
【德商,線上編輯軟體類】
因為寫React不過內嵌的是canvas,是寫Vanilla JavaScript,要轉換成React有效能問題。
考了一些試是直接用口頭回答,是純英文面試,面試官講話蠻清楚的。
考試:
【南港,遊戲相關】
這間的人資有二個蠻可愛的,人也不錯,有英文面試
前端只有二個蠻忙,所以想要多一點人來負擔,有加班費
有現場coding test考重構class to hooks
【內湖直播、遊戲相關】
裡面有直播,沒有iframe,前端只有二個蠻忙,沒有寫測試
【defi相關】Linkedin找的